Curved LED Display Selection for Venues and Installations
Written and reviewed by the ETA Visual Engineering & Project Team. Guidance is updated when project, product or Singapore site-planning practices change.
A curved LED screen can follow a venue’s structure and work outdoors when its modules, enclosure and supporting structure suit the exposure. Concave and convex designs also affect how the image fits the space and meets its viewers. Outdoor suitability is only one part of choosing a led screen curved display. Pixel pitch, viewing positions and installation conditions all matter, whether the screen wraps around a pillar or forms a feature wall. This guide explores construction, outdoor use and screen shapes, then explains how viewing angles and pixel pitch inform selection. You’ll gain a clearer basis for planning a display in Singapore. - Match pixel pitch to the audience’s viewing distance and the level of detail your content needs to show.
Key Takeaways
- Match pixel pitch to the audience’s viewing distance and the level of detail your content needs to show.
- Outdoor suitability depends on more than the display itself: plan for weather exposure and proper structural support.
- Choose between flexible modules and segmented rigid panels based on the curve’s shape and radius.
- Compare concave and convex designs against the room layout and the positions from which people will view the screen.
- Plan the display as part of the installation, including support, access and how the screen will be maintained.
Table of Contents
- Pixel pitch selection
- Q2: Can curved LED screens be used outdoors?
- Curved LED display technology and construction
- Curved LED screen shapes and viewing angles
- Concave and convex curved LED screen designs
- ETA Visual: Indoor P0.9~P5 LED Screens
Pixel pitch selection
Pixel pitch affects image detail, viewing distance and how content appears on a curved display. Choose it alongside the screen dimensions and the audience’s usual viewing positions.
Pixel Pitch Options
Pixel pitch is the distance between the centres of neighbouring pixels, measured in millimetres. A smaller pitch places pixels closer together, supporting finer detail at close viewing positions. Indoor options span P0.9 to P5, with the appropriate choice depending on content, screen size and viewing conditions. Compare the visual result, not just the pitch label: text, product imagery and moving graphics can expose different levels of detail.
For example, compare P0.9 and P5 against the same content at the intended viewing position. Fine text may need tighter pixel spacing than large, simple graphics. A curved surface also changes how viewers approach and face the screen, so assess the image from the sides as well as directly in front. The pitch should serve the real content and layout, not a specification in isolation.
Viewing Distance and Pitch
Viewing distance helps determine whether individual pixels are visible and fine details remain clear. A closer audience generally benefits from tighter pixel spacing, while a more distant audience may not need the same level of detail. Treat this as a design relationship, not a universal distance-to-pitch formula. Content size, ambient light and viewing angle also affect perceived clarity.
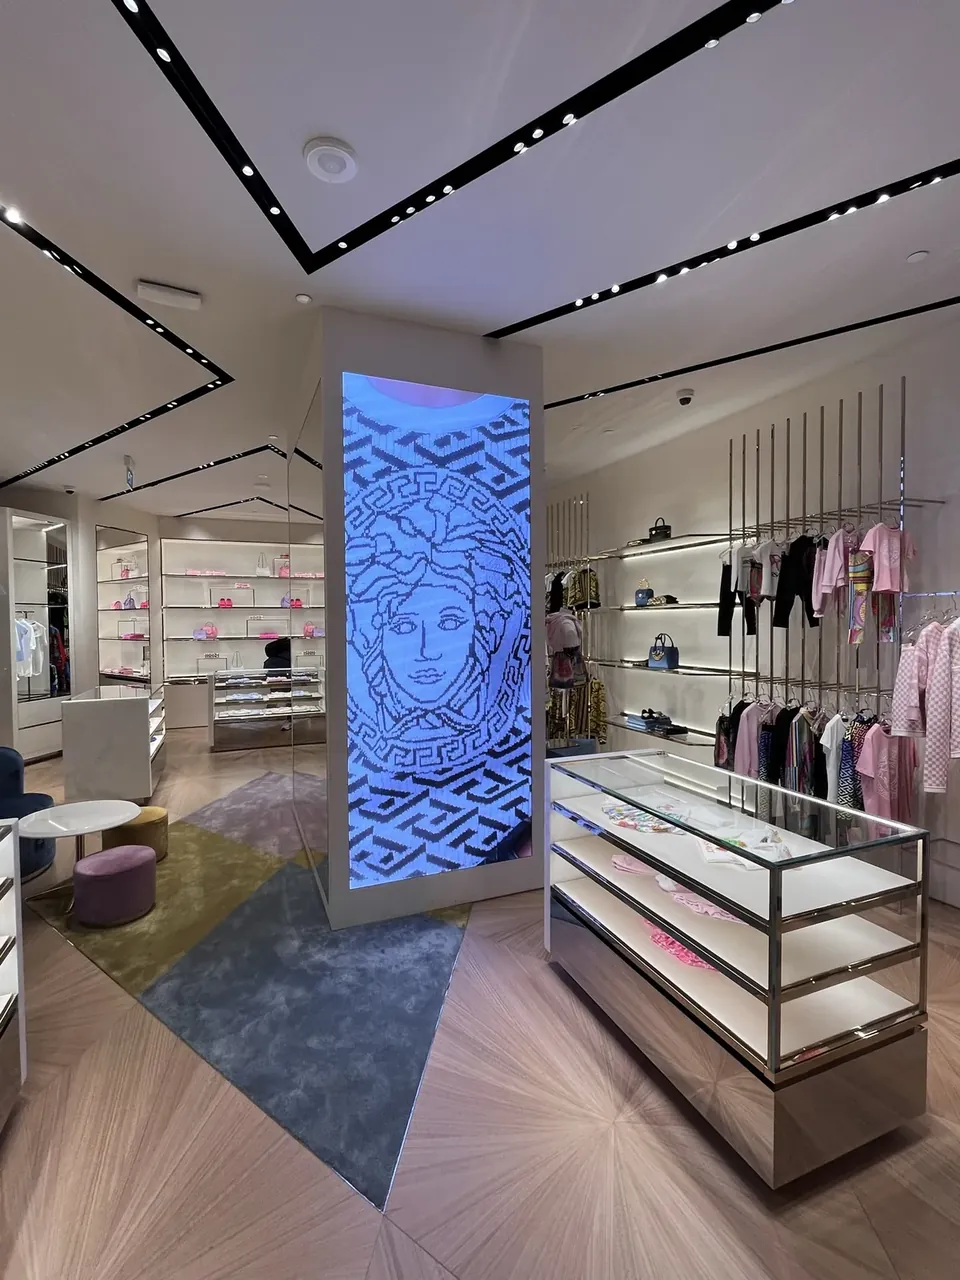
Map the audience’s positions before choosing a pitch. In a retail setting, people may walk close to a curved feature, then view it from further away. Check small text and high-detail imagery from both positions. The curved display at Watsons Takashimaya provides a relevant example of a commercial curved-screen context, where sightlines belong in the planning.
Unit-Case Dimensions and Pitch
Pixel pitch determines pixel density across each cabinet’s active display area. The cabinet’s physical width and height, together with its pitch, determine how many pixels fit across each dimension. This affects the full screen resolution and how source content maps onto the display. Check the cabinet layout before finalising artwork, especially when a curved installation changes the screen’s overall shape.
Compare the proposed cabinet dimensions with the available wall or feature space. Confirm how cabinets join around the curve, whether the finished outline matches the design, and how content will be cropped or scaled. A pitch that looks suitable on a specification sheet may not fit the intended image cleanly. Review a content mock-up at the planned dimensions before approving the display configuration.
Q2: Can curved LED screens be used outdoors?
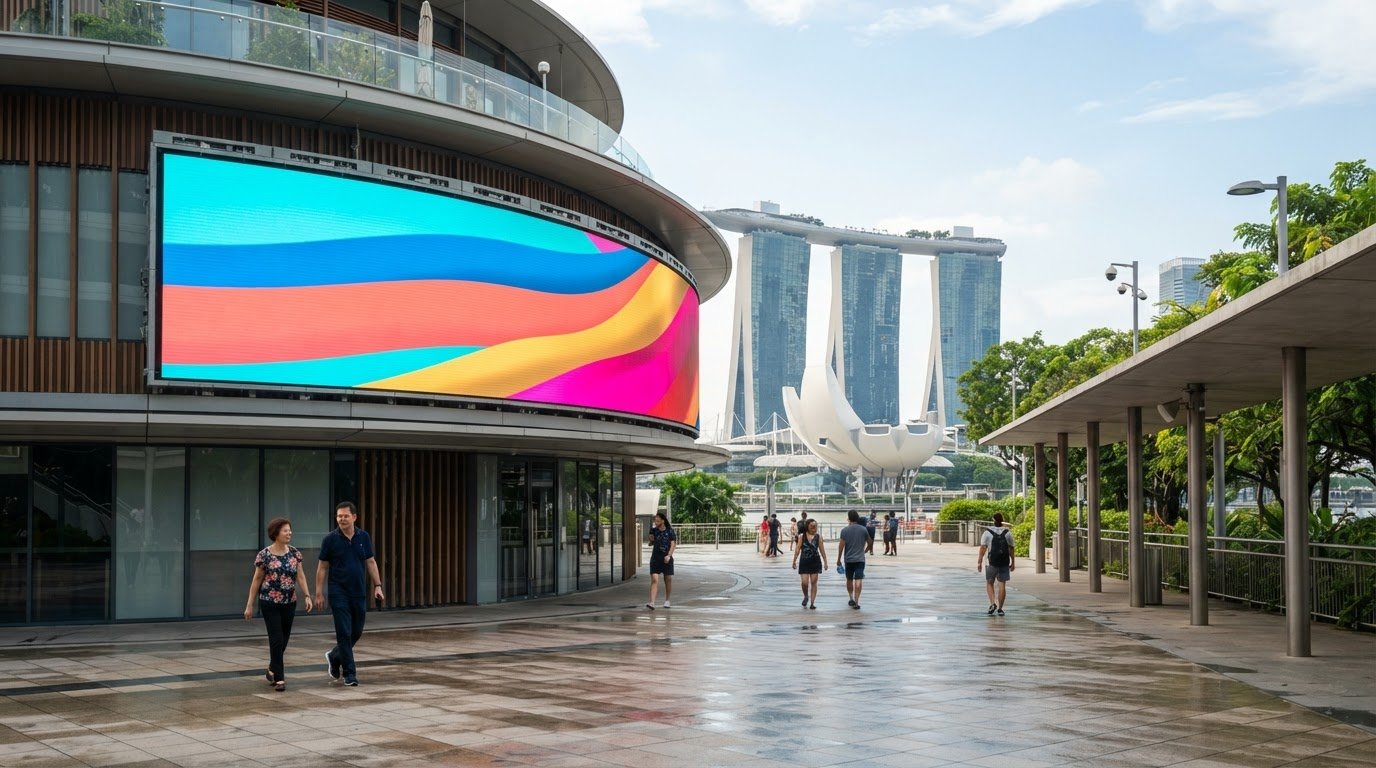
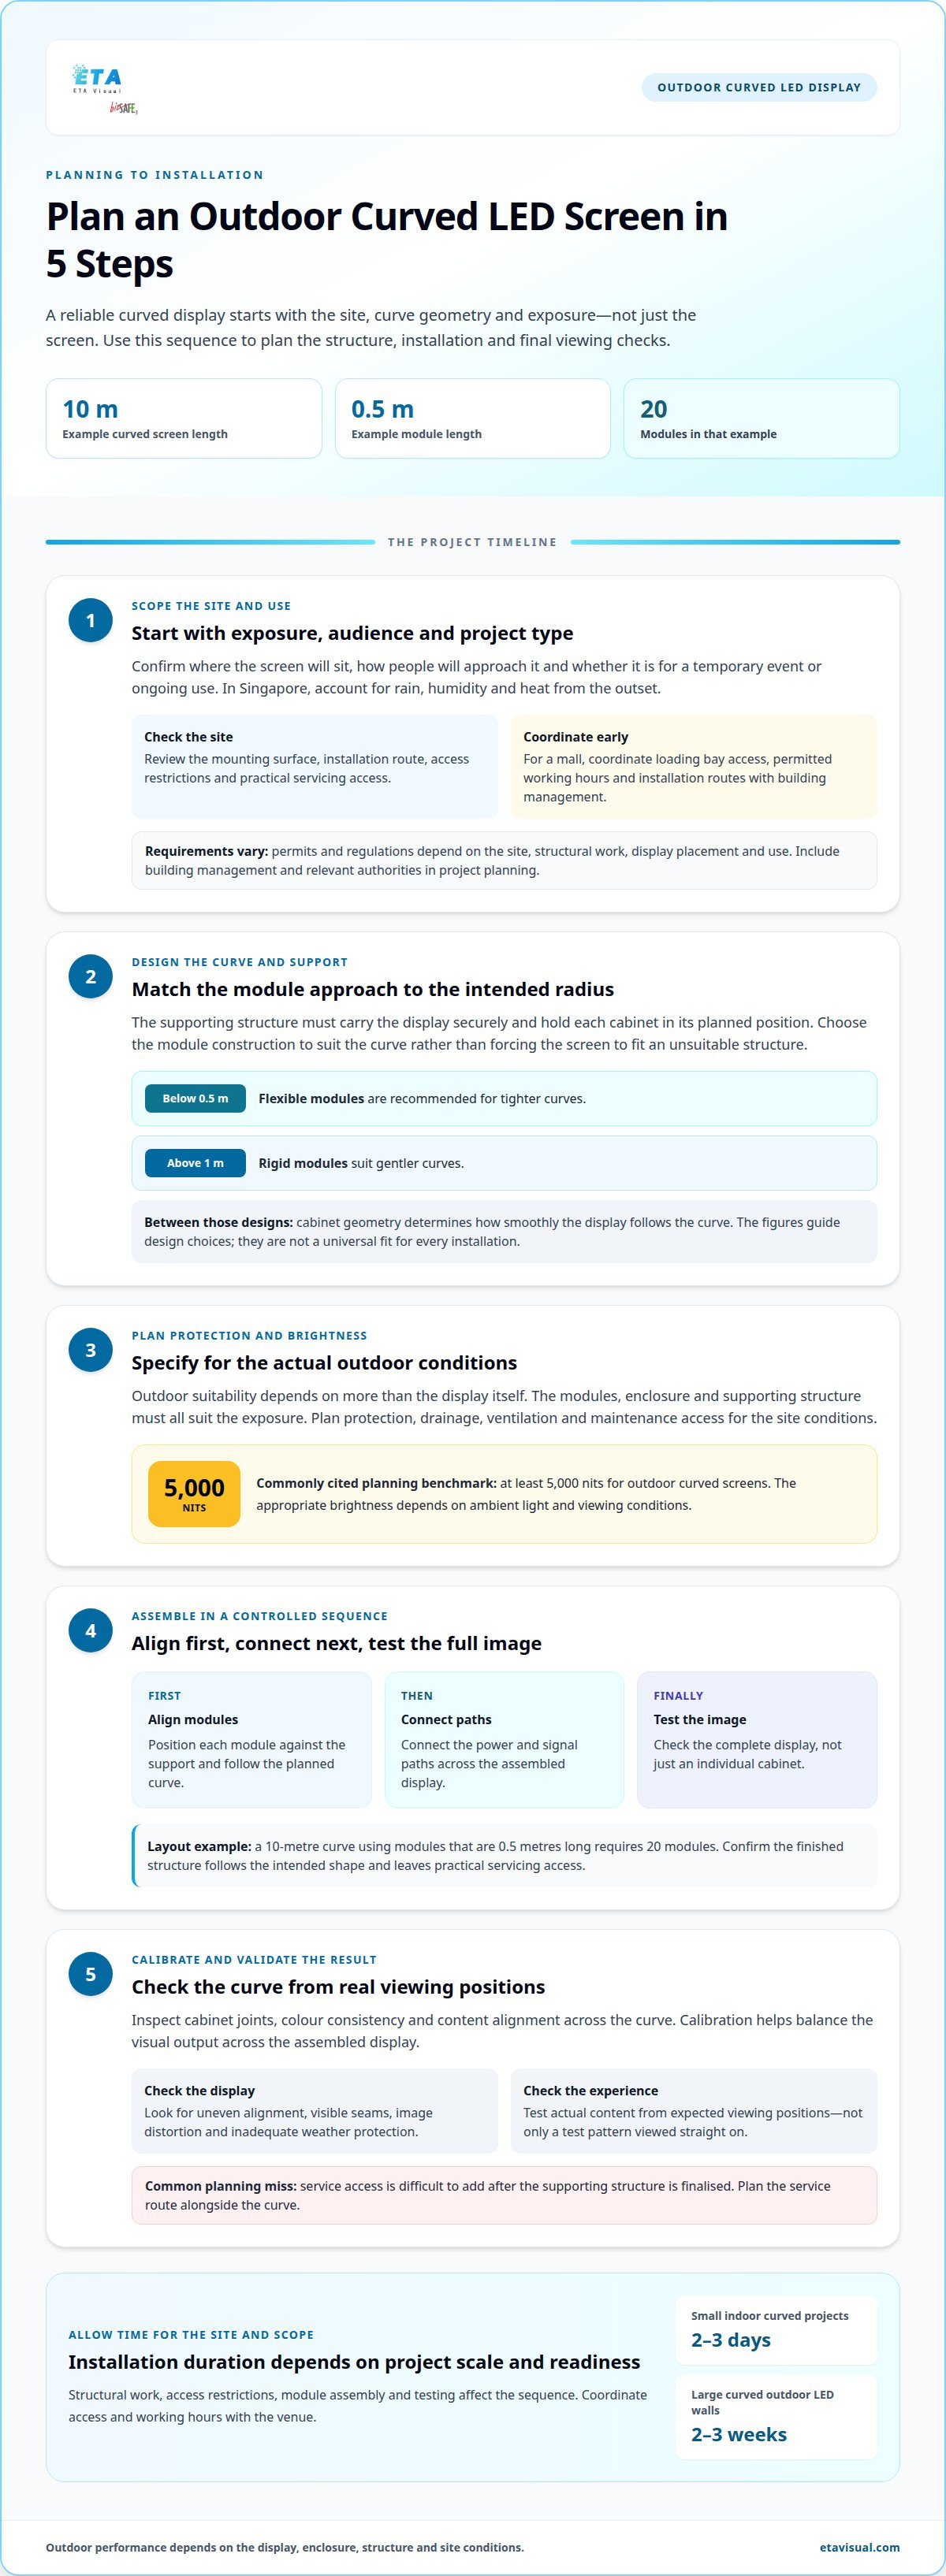
Yes. A curved LED screen can be installed outdoors when its modules, enclosure and supporting structure suit the exposure. In Singapore, rain, humidity and heat make protection, drainage, ventilation and maintenance access important design considerations. A commonly cited planning benchmark for outdoor curved screens is at least 5,000 nits, though the appropriate brightness depends on ambient light and viewing conditions.
Start with the mounting surface and the display’s geometry. Its support must carry the screen securely and hold each cabinet in the planned position. A 10-metre curve using modules that are 0.5 metres long requires 20 modules. This calculation helps define the layout, but the completed structure must also follow the intended shape and leave practical access for servicing.
Install modules in a controlled sequence: align them with the support, connect the power and signal paths, then test the full image. Check cabinet joints, colour consistency and content alignment across the curve. Calibration helps balance the visual output across the assembled display. Test actual content from expected viewing positions, not just a test pattern viewed straight on, to assess the overall effect.
Do curved LED screens in Singapore require permits or comply with local regulations? Requirements depend on the site, structural work, display placement and use. Include building management and relevant authorities in project planning.
Common problems include uneven cabinet alignment, visible seams, image distortion from unsuitable viewing positions and inadequate weather protection. A screen installed around a feature also needs a practical service route. Plan access before finalising the supporting structure, and account for rain, humidity and heat dissipation in Singapore’s outdoor conditions.
Installation time depends on project scale and site readiness. Small indoor curved LED projects can take 2-3 days, while large curved outdoor LED walls can take 2-3 weeks. Structural work, access restrictions, module assembly and testing affect the sequence. For a mall installation, coordinate loading bay access, permitted working hours and installation routes with building management.
Renting can suit a temporary event, while a fixed outdoor display is planned for ongoing use. For a permanent curved display, consider the supporting structure and maintenance plan alongside the visual design. Singapore LED display integration can help frame the project scope around the venue and intended use.
Curved LED display technology and construction
A curved LED display uses cabinets or modules arranged along a shaped surface. Construction depends on the required radius: flexible modules are recommended for curves below 0.5 metres, while rigid modules suit gentle curves above 1 metre. These figures guide design choices, not a universal fit for every installation.
Between those designs, cabinet geometry determines how smoothly the display follows its curve. Traditional curved cabinets can use 4 to 6 flat sides to approximate an arc. Some module designs use a draft angle of about 2 degrees per side, giving one module 4 degrees of total adjustment. The right arrangement depends on the intended radius and how closely the joints must follow it. Review the curved LED integration design alongside the venue layout.
Content needs its own design pass. A flat image can look stretched or compressed when mapped onto a curved surface, especially around logos, circles and text. Prepare artwork for the screen’s actual dimensions and curve, then preview it from the main audience positions. For example, keep important text away from sections where the viewing angle changes sharply. A seamless physical join cannot fix content designed for a flat canvas.
Indoor and outdoor displays also have different design demands. An outdoor curved display requires weather-suitable construction and brightness suited to ambient light; a commonly specified outdoor benchmark is at least 5,000 nits. Indoor installations instead prioritise the room’s lighting, close viewing positions and integration with surrounding finishes. In Singapore, factor humidity, rain exposure and heat management into outdoor planning.
Flat displays are generally easier to install and maintain, and usually require a lower initial investment. A curve can reduce reflections from surrounding surfaces, but its geometry affects support, cabinet alignment and service access. Compare the visual benefit with the structural and maintenance requirements before choosing the shape.
Gaming is another use case. A curved display can place more of the image within a player’s forward field of view, supporting an immersive presentation. However, the intended seating position matters: the BBC notes that viewing outside the ideal position can introduce distortion and glare. Test game interfaces and fine text from the player’s actual position, not only from directly in front.
A curved display’s price depends on screen area, pixel pitch, curve radius, module or cabinet design, supporting structure, control equipment, installation access and commissioning scope. In Singapore, the project quotation reflects these requirements rather than a generic figure, so compare the complete design and integration scope.
Curved LED screen shapes and viewing angles
Screen geometry should follow the audience layout, not just the architectural feature. A cylindrical display can present content around a pillar, while a semi-circular or quarter-circle screen suits a partial wrap. For a circular design, calculate the curved length from the circumference using pi as approximately 3.14, then apply the relevant fraction. This gives the design team a practical starting point for mapping screen dimensions and content.
Viewing experience depends on where people stand relative to the screen’s centre and curve. A concave layout can bring the image towards a central audience area, while a convex layout can face people moving around the display. Map likely viewing positions on the floor plan, including approach routes and side views. At an entrance, for example, check whether visitors can read the main message while walking past, not only from directly in front.
The viewing angle describes how far from the screen’s perpendicular axis people can see usable content. As the angle widens, brightness and colour appearance may change, depending on the display technology and installation. The BBC notes that viewing outside the ideal position can cause image distortion and glare on curved screens. Test actual content from intended positions, particularly small text, logos and high-contrast graphics.
Contrast ratio describes the difference between bright and dark image areas. A display viewed off-axis may appear to have less separation between those areas, even when the source content is unchanged. Ambient light and reflections also affect perceived contrast. In a retail atrium with glass walls, assess the screen under normal lighting and check whether reflections obscure dark scenes or fine details.
Flexible LED supports complex forms, but the selected shape still needs to suit the viewing zone. For a pillar wrap, the radius is half the pillar’s diameter; then consider where the audience will gather and how much of the circumference should display content. A 360-degree layout serves viewers around the pillar, while a partial curve can direct content towards a defined walkway. Keep key messages on the most visible face, and avoid placing essential text across sharp changes in viewing direction.
Before approving a curved display for a venue, mark primary and secondary viewing positions and review a visual mock-up from each. Compare colour, text legibility and reflections at those locations. This gives the team a clearer basis for choosing the curve and orientation than a front-facing rendering alone.
Concave and convex curved LED screen designs
Concave and convex describe the direction in which a display’s face bends. A concave screen curves inward, towards its viewing area; a convex screen bows outward, towards its audience. This changes the relationship between panels, viewers and surrounding architecture. Choose the curve by mapping the audience first, then matching the display orientation to their sightlines.
A concave design can frame a defined audience zone. For example, a hotel presentation area may use an inward-facing curve to bring the visual field around seated guests. This can create a more enveloping composition, but it also makes the central viewing position especially important. Check whether people seated at the edges can still read text and recognise images without excessive distortion.
A convex design can face content outwards towards people approaching from different directions. A retail feature beside a busy walkway may use this shape to make more of the display visible to passing visitors. The image changes orientation across the curve, so place essential wording and logos where they remain legible from the main approach. Test the actual content from both sides of the route.
For either shape, the panel arrangement must follow the intended curve without creating distracting transitions. Flexible modules can form tighter curves, while segmented panels can approximate gentler arcs. The radius, cabinet design and support structure determine how closely the finished face follows the plan. Review a front elevation and side profile together; a flat drawing alone can hide how the curve projects into the space.
Brightness and reflections also affect the result. A concave surface can bring reflected light towards the viewing zone, while a convex face presents changing angles to people moving past it. In a Singapore mall with glass frontage, inspect the display under the venue’s normal lighting. Review bright and dark content, then adjust screen orientation or content placement if reflections interfere with key information.
Content should be created for the chosen shape, not simply stretched across a curved canvas. On a concave screen, a panoramic image can draw attention towards its centre. On a convex screen, a sequence of panels can carry a message along the audience’s approach. Review straight lines, faces and product imagery, since curved mapping can alter their appearance. Preview motion content as well as still graphics.
The practical takeaway is simple: choose concave for a focused, inward-facing experience, and convex when the display should address outward-moving sightlines. Confirm the curve against a venue plan, audience positions, content mock-ups and a maintenance route. For a commercial project, discuss the proposed curve with an LED display integration specialist.
Discuss your curved display project
ETA Visual: Indoor P0.9~P5 LED Screens
ETA Visual helps businesses match indoor LED screens to the venue, content and audience viewing positions. Its Indoor P0.9~P5 LED Screens cover a range of pixel pitches, while Flexible & Curved LED supports projects where the display must follow a concave, convex or architectural form.
Bring the proposed screen location, approximate dimensions, content requirements and audience layout into the discussion. These details help shape a practical design, including the display format and how it fits the space. For outdoor applications, ETA Visual also offers Outdoor LED Billboards; Transparent LED Displays are another option when visibility through the display matters.
Discuss your curved LED display requirements with ETA Visual or visit etavisual.com.
Plan the Display Around Its Future Use
The strongest next step is to turn the design idea into a site-specific brief. Note where audiences will approach, what content the display needs to show, and how the screen should fit the venue’s architecture. For a curved LED screen, these details help align the visual concept with installation needs from the outset.
ETA Visual offers Indoor P0.9~P5 LED Screens, Outdoor LED Billboards and Transparent LED Displays. Share the intended location, content and preferred shape to start a focused discussion about the right display direction for your space.
A well-planned display can become a considered part of the venue, rather than simply another screen. Take the next step when you’re ready to turn the idea into a practical project.
Q1: Are flexible LED screens durable?
Flexible LED screens are designed to bend within specified limits, but durability depends on correct handling and installation. Robust printed circuit boards and protective coatings, including GOB, can help resist bending stress, dust and accidental impact. For example, don’t treat a flexible module as freely foldable: its construction has a designed bend range. Match the module to the planned curve, then consider exposure and access when planning cleaning and maintenance.
Q4: Can I display regular content on a curved LED wall?
Yes, regular video and graphics can be shown, but the content should suit the display’s curved layout. A flat image may look stretched or compressed when mapped across the arc, particularly near its edges. For example, prepare a version that keeps logos and text away from areas with pronounced distortion. Preview the actual content on the intended screen shape and check it from the audience’s usual positions before finalising playback.
Q6: How long does installation take?
Most indoor retail installations are completed within a few days once hardware arrives. The exact schedule is confirmed after a site survey and design. A curved installation may involve cabinet alignment, support preparation, signal connections and image testing, so site access and readiness affect the sequence. For a mall project, coordinate delivery routes, loading bay arrangements and permitted work periods with building management before installation begins.
What is a curved LED screen and how does it work?
A curved LED screen is assembled from modules or cabinets arranged along a non-flat surface. Each section contributes to the overall image, while the system maps content across the configured display area. The curve may wrap around a feature or face a specific audience zone. For example, a screen around a pillar can show one continuous visual composition, provided the content is prepared for its layout.
What types of curved LED screens are available?
Curved displays can use flexible modules for shaped surfaces or rigid cabinets arranged in segments to form a gentler curve. Designs may be concave, curving towards viewers, or convex, bowing outwards. A cylindrical screen wraps around a central feature, while partial curves cover only part of a structure. Indoor and outdoor configurations also have different environmental design requirements, so choose the type to suit the venue and installation conditions.
How to choose the right pixel pitch and viewing distance for a curved LED screen?
Choose pixel pitch by considering how close people stand and how much detail the content contains. Indoor LED screens are available from P0.9P5, with P0.9P2.5 recommended for closer viewing. For example, small text viewed nearby benefits from tighter pixel spacing than simple, large graphics seen from farther away. Assess the planned viewing positions and test representative content, including text and product images, before settling on the specification.
Curved LED screen vs flat LED screen: which is better?
Neither shape is automatically better; the venue and audience determine which fits best. Flat displays are generally easier to install and maintain, and usually require a lower initial investment. A curved screen can suit a pillar, feature wall or audience spread across a wider area. For a straightforward wall installation, a flat screen may be practical; choose a curve when the architecture or viewing layout benefits from its shape.
Can LED screens be curved concave or convex, and what is the minimum curve radius?
Yes, LED displays can be designed with concave or convex curves. Flexible modules are recommended for radii below 0.5 metres, while regular rigid modules can work for gentle curves above 1 metre. These are design recommendations, not a universal minimum radius for every screen. The achievable curve depends on module or cabinet construction, so define the required shape and radius before selecting the display system.
Visual planning reference
| Planning factor | What to define | Why it matters |
|---|---|---|
| Viewing positions | Nearest viewing distance and audience locations | Supports an appropriate pixel-pitch and screen-size decision. |
| Content workflow | Input sources, resolutions and control workflow | Helps ensure information remains readable and simple to operate. |
| Installation conditions | Structure, access, power, ventilation and maintenance access | Aligns the display scope with the physical site before procurement. |
Want an accurate budget for your space?
We'll do a free site survey and prepare a clear, itemised quotation — no obligation.
Frequently asked questions
Flexible LED screens are designed to bend within specified limits, but durability depends on correct handling and installation. Robust printed circuit boards and protective coatings, including GOB, can help resist bending stress, dust and accidental impact. For example, don’t treat a flexible module as freely foldable: its construction has a designed bend range. Match the module to the planned curve, then consider exposure and access when planning cleaning and maintenance.
Yes, regular video and graphics can be shown, but the content should suit the display’s curved layout. A flat image may look stretched or compressed when mapped across the arc, particularly near its edges. For example, prepare a version that keeps logos and text away from areas with pronounced distortion. Preview the actual content on the intended screen shape and check it from the audience’s usual positions before finalising playback.
Most indoor retail installations are completed within a few days once hardware arrives. The exact schedule is confirmed after a site survey and design. A curved installation may involve cabinet alignment, support preparation, signal connections and image testing, so site access and readiness affect the sequence. For a mall project, coordinate delivery routes, loading bay arrangements and permitted work periods with building management before installation begins.
A curved LED screen is assembled from modules or cabinets arranged along a non-flat surface. Each section contributes to the overall image, while the system maps content across the configured display area. The curve may wrap around a feature or face a specific audience zone. For example, a screen around a pillar can show one continuous visual composition, provided the content is prepared for its layout.
Curved displays can use flexible modules for shaped surfaces or rigid cabinets arranged in segments to form a gentler curve. Designs may be concave, curving towards viewers, or convex, bowing outwards. A cylindrical screen wraps around a central feature, while partial curves cover only part of a structure. Indoor and outdoor configurations also have different environmental design requirements, so choose the type to suit the venue and installation conditions.
Choose pixel pitch by considering how close people stand and how much detail the content contains. Indoor LED screens are available from P0.9~P5, with P0.9~P2.5 recommended for closer viewing. For example, small text viewed nearby benefits from tighter pixel spacing than simple, large graphics seen from farther away. Assess the planned viewing positions and test representative content, including text and product images, before settling on the specification.
Plan the next step
Continue with a relevant solution and real Singapore project evidence.